

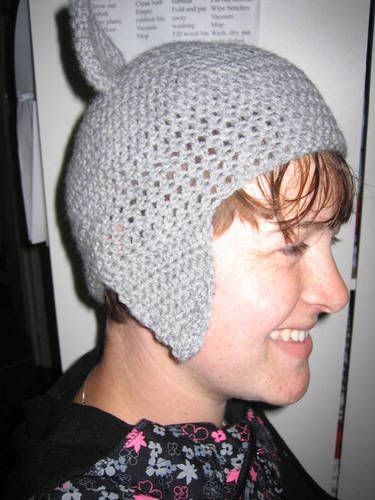
11.17.2009
Crochet Pattern: Kitty Hat with Earflaps
I used Red Heart soft yarn/medium/4 and stuffed the ears!
It's currently being tested :)
Bubblegum_phoenix (from Craftster.org) tested and gave me revisions!
Patons merino/medium 4.5mm hook and did not stuff ears.
Foundation: Chain 3. Dc 8 times into the third ch from hook. Join by sl st.
1. Ch 2. 2Dc in ea dc. join.
2. Ch 2. Dc in next st, 2 Dc in next st around. join.
3. Ch 2. Dc in next 2 sts, 2 Dc in next st around. join
4. Ch 2. Dc in next 3 sts, 2 Dc in next st around. join.
5. Ch 2. Dc in next 4 sts, 2 Dc in next st around. join.
6. Ch 2. Dc in next 5 sts, 2 Dc in next st around. join.
7. Ch 2. Dc in next 6 sts, 2 Dc in next st around. join.
8. Ch 2. Dc in next 7 sts, 2 Dc in next st around. join.
9. Ch 2. Sc in next 8 sts, 2 Sc in next around. join
Increase to 9-11 SCs (+ ',2 sc in next st around') if you have to.
++Receiving emails that this hat is small (faq)
10. Ch 2. Sc in ea st. join
11-13. Ch 2. Sc in 7sts, sc-tog (decrease) in next st around. join.
14-15. Ch 3. Sc in each st. join
Repeat until the desired length or until beanie reaches the top of your ears.
Decide where you want your earflaps to be.
I fold the hat so the back seams at the back (rather than down a side) and count along the side, placing a stitch marker where I want to start.
EARFLAPS
1. Make a slipknot, join where you want to start by doing a sl st. Sc across 12 sts. turn.
2. Ch 1, skip 1, sc across 11 sts. turn.
3. Sc in all stitches across. turn.
4-5. Ch 1, hdc across 11 sts. turn.
6. Ch 1, skip a stitch, hdc-tog in next 2 sts, hdc 8 times across. turn.
7. Ch 1, skip a stitch, hdc-tog in next 2 sts, hdc 6 times across. turn.
8. Ch 1, skip a stitch, hdc-tog in next 2 sts, hdc 4 times across. turn.
9. Ch 1, skip a stitch, hdc-tog in next 2 sts, hdc 2 times across. turn.
10. Ch 1, hdc-tog in next 2 sts. turn.
11. Slip stitch into the last top hdc.
Measure by folding the hat and comparing lengths to start on the other side.
CAT EARS
(make 2, working in the round)
1. Ch 2. hdc 6 times into ring.
2. Ch 1, 6 hdc around.
3. Ch 1, 2 hdc in each sc around.
4. Ch 1, 12 hdc around.
5. Ch 1, *2 hdc in next st, 1 hdc* around.
6. Ch 1, hdc in each stitch.
7. Ch 1, *2 hdc in next st, hdc in next 2 sts* around.
8. Ch 1. sc in each sc around.
Tie off and stitch in position of where you want the ears. Best way to do this is put the hat on and carefully pin in place first.
View this on Ravelry!
10.26.2009
Crochet Pattern: Mini Top Hat

I made this mini top hat for fun. I wish I had extra supplies to make it more interesting. I already had a plan to be able to make this stay up and be firm. Red Heart was perfect for this purpose because it's a stiffer yarn. This pattern uses back post and front post stitches in order to get this shape.
Basic pattern:
6 sc into a ring
*Sc in one st, 2 sc in the next* repeat around
*Sc in the next 2 sts, 2 sc in the next* repeat around
*Sc in the next 3 sts, 2 sc in the next* repeat around
*Sc in the next 4 sts, 2 sc in the next* repeat around
Continue increasing your circle for your desired size.
Here's a tutorial for a back post stitch. Instead of doing it as a double crochet, you want to do it small like a single crochet.
- Back post single crochet around.
-Single crochet in the back loops
Repeat the last round for the desired length.
Now we are going to do a front post stitch but as a single crochet instead.
-Front post single crochet around.
-*Single crochet in the next 5 sts, increase* around
-Sc around
-Another increase around if needed
Attach yarn to the sides to make a chain in order to tie it around your head.
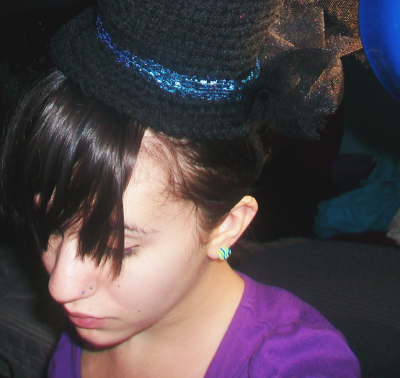
I added thread/yarn and tulle on mine.
8.21.2009
Crochet Pattern: Original Pokeball Hat
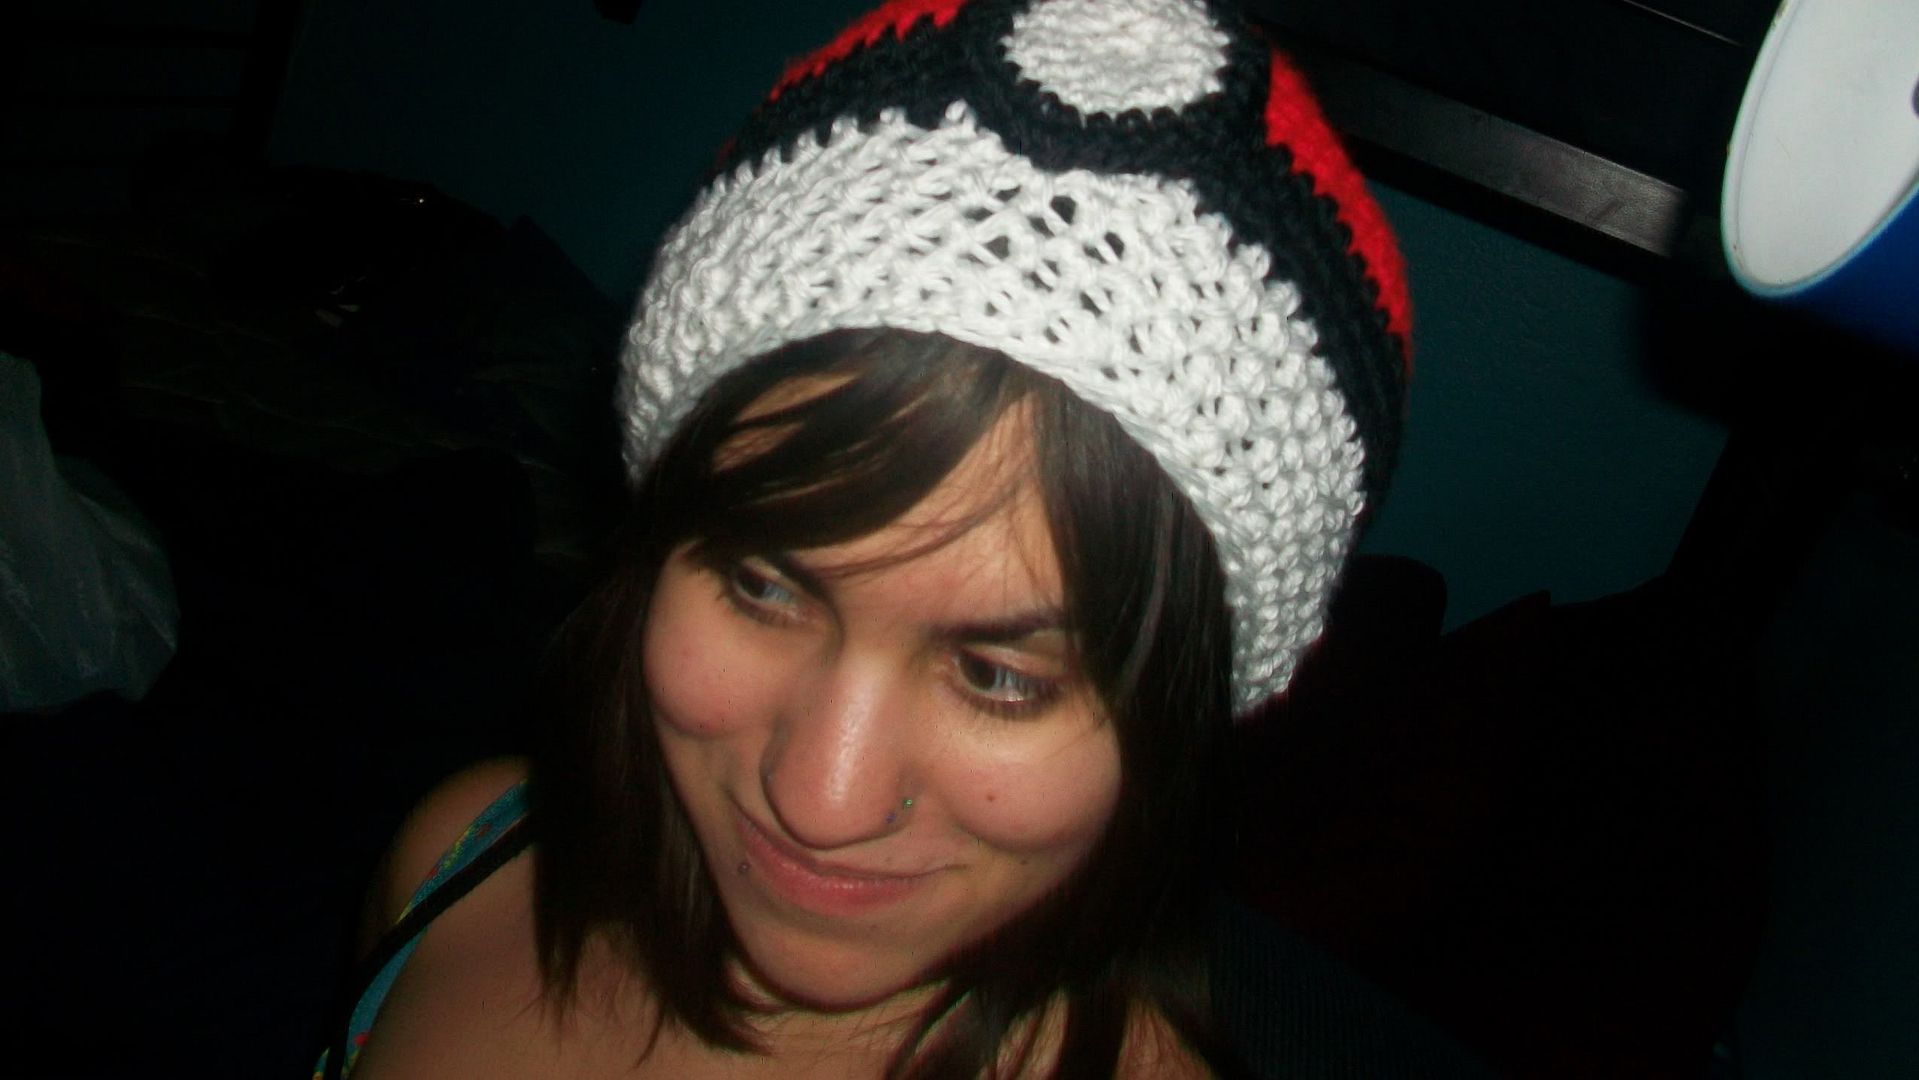
I made this hat originally for myself and I decided to share the pattern on my blog. There have been several comments about this hat coming out too small. Just for reference, my head circumference is 22" but I can fit in young adult sizes. If you like this pattern then you can make adjustments by doing more increase rounds.
Another version is available here if you need a larger size.
P.S. Join by slip stitch or keep going around whatever your preference is.
I used Caron yarn.
I hook
with red yarn
Chain 3. 6 half double crochet into the ring.
Chain 2. 2 hdc (increase) in each stitch.
Chain 2. 1 hdc in next st, 2 hdc in the next.
Ch 2. 1 hdc in next 2 sts, 2 hdc in the next.
Ch 2. 1 hdc in the next 3 sts, 2 hdc in the next.
Ch 2. 1 hdc in the next 4 sts, 2 hdc in the next.
Ch 2. 1 hdc in the next 5 sts, 2 hdc in the next.
Ch 2. 1 hdc in the next 6 sts, 2 hdc in the next.
Ch 2. 1 hdc in the next 7 sts, 2 hdc in the next.
Ch 2. hdc across.
Ch 2. hdc across.
Ch 2. hdc across.
Ch 2. hdc across.
Black:
Ch 2. hdc across.
Ch 2. hdc across 7 times, hdc decrease in the next 2 stitches.
Ch 2. hdc across.
Ch 2. hdc across 7 times, hdc decrease in the next 2 stitches.
Ch 2. hdc across 5 times, hdc decrease in the next 2 stitches.
White:
Ch 2. hdc across
Circle piece:
H or I hook
Start with white yarn:
Ch 3. hdc 6 times into the first chain to form a ring.
Ch 2. 2 hdc in each st around.
Ch 2. 2hdc in the next st, 1 hdc in the next st around.
Black as the border around the circle:
Ch 2. 2hdc in the next 2 sts, 1 hdc in the next st around.
Sew this piece on the center
3.07.2009
Crochet Pattern: Simple Mesh Headband
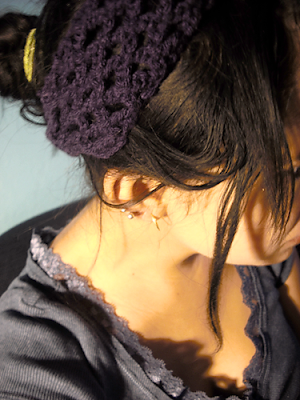
This is my latest complete project. I wanted to try to make a headband but I had my eye on a mesh-like design instead of it being solid. The yarn was Caron Simply Soft. My result ended with a long headband.
Headband:
Chain 25
1. Slip stitch into the 10th chain from hook.
*Chain 5, skip next 4 stitches, slip stitch* in the next chain. repeat. End with a slipstitch in the last chain. Turn.
2. Chain 5, slip stitch in 3rd chain of each 5 chain space (middle) * repeat to the last. Turn.
Repeat #2 until your desired length.
Cut and weave in the ends.
Strap:
I started at the third hole on the side.
1. Slip stitch every chain in that hole. Chain 2-3. Double crochet in next 4 stitches. Turn.
2. Single crochet 4 times. Turn.
Repeat #2 until it's long enough to tie around your head.
Sew a button on the end and you can push it through one of the holes to keep it together.


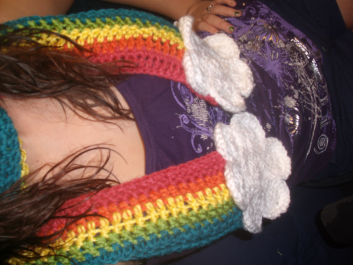
It's been 9 years since I originally made this scarf for a craft swap. I was trying to figure out what I could make with my current supplies at the time. I just grabbed leftover balls of yarn to create it which meant not every color had the same weight/brand. This is finally getting the revision it desperately needs. The original pattern I'll keep at the bottom of the post and I'll explain why.
Revision: June 6, 2018
Rainbow Scarf
H hook
Start off with as many chains you want for length.
(The scarf I made here had 235 chains for a very long scarf that could wrap around the neck twice and hang long.)
Pink: Half Double crochet across until the end. Turn.
Chain 2. Single crochet across until end.
Orange: Chain 3. Half double crochet across until the end. Turn.
Yellow: Chain 3. Half double crochet across until the end. Turn.
Green: Chain 3. Half double crochet across until the end. Turn.
Blue: Chain 3. Half double crochet across until the end. Turn.
Purple: Chain 3. Half double crochet across until the end. Turn.
Chain 2. Single crochet across until end. Tie off.
Weave in all the ends.
Clouds
H hook
Note: Original clouds looked like a flower with 7 pieces. Total 14 pieces made.
The revision has +2 more pieces to create asymmetrical clouds.
White:
Double crochet 6 times into magic ring. Sl st together.
Chain 2. Double crochet twice (increase) in each stitch around.
Sl st together to join and tie off.
Assembly:
Pin two circles together. A weaving needle is easier to use for these. Grab the outer loop only when you attach pieces instead of going through both. You will have 1 circle in the center and 6 other circles surrounding it to look like a flower. In the revised pattern, I have flipped over the clouds so it looks puffy against the scarf.
---

Why the revision?
If you have a thicker yarn, you could get away with a row of double crochet or two single crochet rows.
If the yarn is on the thinner side, you'll need to do extra rows to create each color as "even" as possible if that's what you're looking for.
Rainbow:
Start off with as many chains you want for length.
Red/Pink: Chain 3. Single crochet across until the end. Turn.
Chain 3. Double crochet across. Turn.
Orange: Chain 3, single crochet across. Turn.
Chain 3, single crochet across. Turn.
Yellow: Chain 3, double crochet across. Turn.
Green: Chain 3, half double crochet across. Turn.
Blue: Chain 3, double crochet across. Turn.
Chain 3, double crochet across. Tie off.
Weave in all the ends! :(
You will be making 7 circular pieces that will be sewn together for the clouds. I recommend to attach the pieces using white yarn and secure it tighter by sewing with white thread.
Clouds:
You can use a smaller hook to get the circles more tight and flat.
White yarn:
Chain 3, Double crochet 6 times into 2nd chain from hook.
Chain 3. Double crochet twice (increase) in each stitch around. Join and tie off.
Subscribe to:
Posts (Atom)


Social Icons