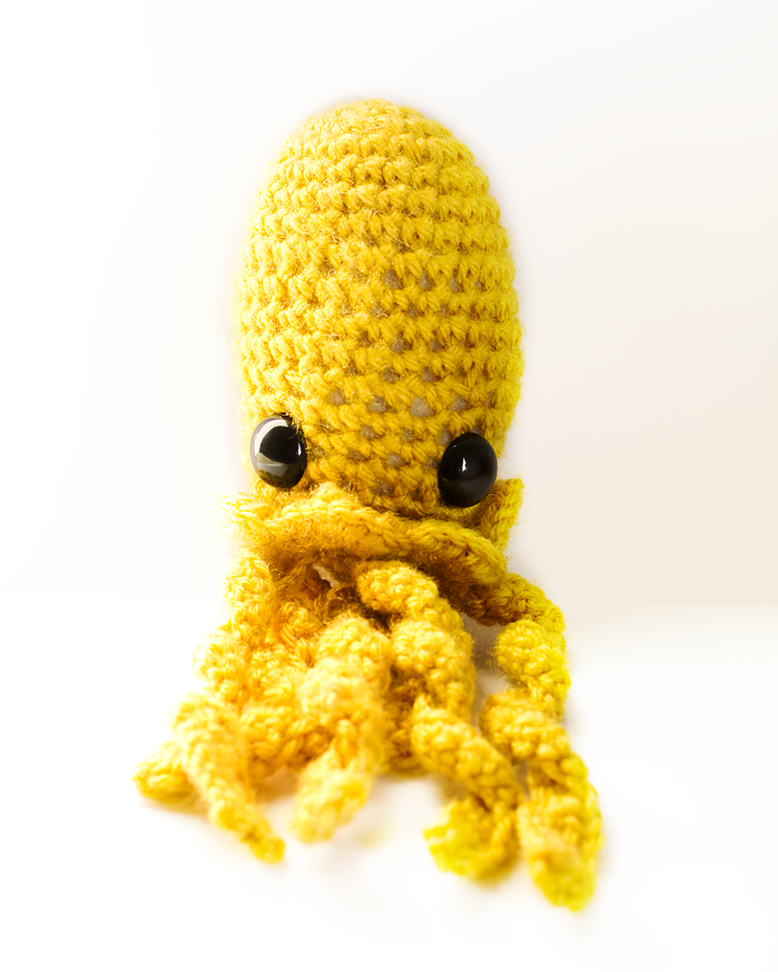
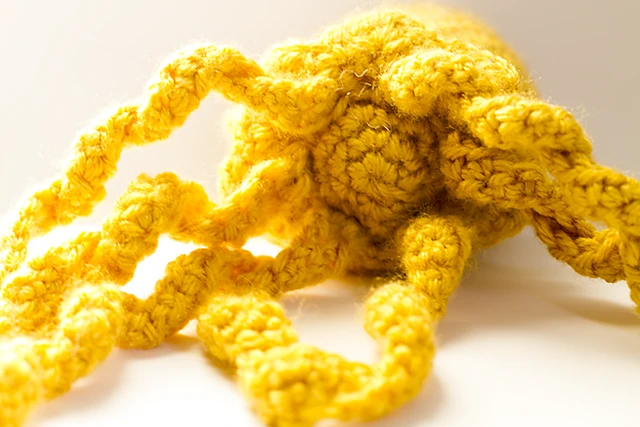
This squid pattern involves crochet and knit. I think it's still a good project for a beginner though
Published on Aug 2013
Materials:
C or D crochet hook
5.00mm knitting needles
Worsted weight yarn
9mm safety eyes
Polyfil stuffing
Optional: Weaving yarn needle
Stitches:
Single crochet
Increase (two single crochet stitches in one)
Decrease (skip a stitch or single crochet 2 stitches together)
HEAD
Magic Ring
1. Single crochet 6 times. (6)
2. Increase around (12)
3. “Inc in the next st, sc” around (18)
4. Sc around. (18)
5. “Inc, sc in the next 2 sts” around (24)
6. Sc around (24)
7. Sc around (24)
8. Sc around (24)
9. Sc around (24)
10. “Sc in the next 5 sts, dec” Sc in the last 3 sts (21)
11. Sc around (21)
12. Sc around (21)
13. Sc around (21)
14. Sc around (21)
15. Sc around (21)
16. Sc around (21)
17. Sc around (21)
18. Sc around (21)
Stuff it and leave a short tail.
Tentacles (6)
Cast off 3 stitches.
1. Knit 3 stitches. Turn.
2. Repeat row 1 for your length.
I normally do 25-30 rows.
Bind off and leave a decent size tail to attach.
Circle Piece
Magic Ring
1. Single crochet 6 times. (6)
2. Increase around (12)
3. “Inc in the next st, sc” around three times. (9)
Sl st into next. Leave a long tail.
Please do share pictures/links with me if you make one!! ♥
Showing posts with label patterns. Show all posts
Koala Amigurumi Pattern
Materials
- D crochet hook
- Worsted Weight Yarn in Grey and Black
- 9mm safety eyes
- White Felt and Thread for inner ears
- Polyfil stuffing
- Sewing Needle
- Yarn needle
Head
R1: 6 sc into ring.
R2: increase in every st.
R3: *sc, inc* around.
R4: *sc in the next 2 sts, inc* around.
R5: *sc in the next 3 sts, inc* around.
R6-R10: sc around
R11: *sc in the next 4 sts, dec.* around. End with a sc.
Start stuffing, make the nose, and place the safety eyes before finishing the next rounds.
R12: sc
R13: *sc in the next 3 sts, decrease in the next* around.
R14: *sc, decrease in the next* around. End with a sc.
R15: decrease around. sl st once to close the hole.
Nose
R1: ch 4 into ring.
R2: skip 1 ch, sc across
R3: turn to the other side. Sc across. Sl st into the last.
Pin this on the face and put the safety eyes 2 stitches away.
Legs (Make 2)
R1: 5 sc into ring.
R2-R5: sc around.
Sl st into the next st
These will be left open since we will attach them to the body. Stuff each leg lightly.

Body
Place your legs side by side. Attach your yarn by a sl st to the right side of the right leg.
Sc across 3 times. Hold the 2nd leg at the left then sl st and sc in one st to attach.
R1: 5 sc into ring.
R2-R5: sc around.
Sl st into the next st
These will be left open since we will attach them to the body. Stuff each leg lightly.

Body
Place your legs side by side. Attach your yarn by a sl st to the right side of the right leg.
Sc across 3 times. Hold the 2nd leg at the left then sl st and sc in one st to attach.
R1: Sc around including the middle part.
R2: *Sc in the next 4 sts, decrease in the next* around.
R3-R4: Sc around.
R5: *Sc in the next 2 sts, decrease in the next* around.
R6: *Sc in the next 2 sts, decrease in the next* around.
Leave a long tail to attach to the head.
Arms
R1: 4 sc in magic ring.
R2-R5: sc around.
Ears
R1: 4 sc into ring.
R2: inc around
R3: *sc, increase in the next* around.
R4: "sc in the next 2sts, increase in the next* around.
R5-R6: sc around.
R7: *sc in the next 3 sts, increase in the next* around.
R8: *sc in the next 4 sts, increase in the next* around.
R9: sc around.
Leave tails for attaching it to the head.
Cut out small half circles and place them over the ears. Trim it if necessary then sew it on.
Assembly: Pin the ears on each side and look at the top of the head to see if it's aligned. Weave the ends in. Pin the head and body together as best as you can then attach it by weaving the ends in. Pin the arms in place and do the same thing.
Crochet Pattern: Fox Hat
Materials:
H or I crochet hook
Orange, Black & White in worsted weight yarn
Black & White Thread
Sewing needle
Pattern:
Chain 4 and join with a slip stitch to the first chain to make a ring.
R1: Hdc 8 times into ring.
R2: 2 Hdc around.
R3: *Hdc once, 2 Hdc in the next stitch* around.
R4: *Hdc in the next 2 sts, 2 Hdc* around
R5: *Hdc in the next 3 sts, 2 Hdc * around.
R6: Ch 1, *Hdc in next 4 sts, 2 Hdc* around.
R7: *Hdc in the next 5 sts, 2 Hdc* around.
R8: *Hdc in next 6 sts, 2 Hdc* around.
R9: Hdc in every stitch around.
R10: Hdc in every stitch around.
R11: Hdc in every stitch around.
R12: Hdc in every stitch around.
R13: Hdc in every stitch around.
R14: Hdc in every stitch around.
R15: Hdc in every stitch around.
Cut a short tail and attach black yarn
R16: Hdc in every stitch around. Slip stitch in the last stitch.
Cut a short tail and attach white yarn
R17: Hdc in every stitch around.
R18: Hdc in every stitch around.
R19: Hdc in every stitch around.
R20: Hdc in every stitch around.
R21: Hdc in every stitch around.
Ears (make 2)
Begin with the orange yarn.
1. 5 sc into ring.
2. Sc in the next 2 sts, Inc once, Sc in the last 2 sts.
3. "Inc in one st, Sc in the next" around.
End with one Inc.
4. "Inc, Sc in the next 2 sts" around.
5. "Inc, Sc in the next 3 sts" around.
6. Sc in every stitch around.
7. Sc in every stitch around.
8. Sc in every stitch around.
9. Sc in every stitch around.
10. Sc in every stitch around.
Leave a long tail to use for attaching to the hat.
Begin with white yarn.
1. Ch 3. Skip one st and sc in next 2 chains.
2. Inc in every stitch around.
3. Inc once, Sc across, end with one Inc.
4. Inc once, Sc across, end with one Inc.
5. Dec once, Sc across, end with one Inc.
6. Sc in every stitch around.
7. Sc in every stitch around.
8. Sc in every stitch around.
Cut a short tail and weave ends in. You will need white thread to sew this onto your ear.
Begin with black yarn.
Chain 11.
1. Skip one chain, Sc in the next 5 chs, Inc once and Sc in the next 4 chs.
Cut a short tail and weave ends in. It's best to attach the white piece onto the orange piece of ear. The black piece will form to the top. Sew pieces into place.
Pattern:
Chain 4 and join with a slip stitch to the first chain to make a ring.
R1: Hdc 8 times into ring.
R2: 2 Hdc around.
R3: *Hdc once, 2 Hdc in the next stitch* around.
R4: *Hdc in the next 2 sts, 2 Hdc* around
R5: *Hdc in the next 3 sts, 2 Hdc * around.
R6: Ch 1, *Hdc in next 4 sts, 2 Hdc* around.
R7: *Hdc in the next 5 sts, 2 Hdc* around.
R8: *Hdc in next 6 sts, 2 Hdc* around.
R9: Hdc in every stitch around.
R10: Hdc in every stitch around.
R11: Hdc in every stitch around.
R12: Hdc in every stitch around.
R13: Hdc in every stitch around.
R14: Hdc in every stitch around.
R15: Hdc in every stitch around.
Cut a short tail and attach black yarn
R16: Hdc in every stitch around. Slip stitch in the last stitch.
Cut a short tail and attach white yarn
R17: Hdc in every stitch around.
R18: Hdc in every stitch around.
R19: Hdc in every stitch around.
R20: Hdc in every stitch around.
R21: Hdc in every stitch around.
Ears (make 2)
Begin with the orange yarn.
1. 5 sc into ring.
2. Sc in the next 2 sts, Inc once, Sc in the last 2 sts.
3. "Inc in one st, Sc in the next" around.
End with one Inc.
4. "Inc, Sc in the next 2 sts" around.
5. "Inc, Sc in the next 3 sts" around.
6. Sc in every stitch around.
7. Sc in every stitch around.
8. Sc in every stitch around.
9. Sc in every stitch around.
10. Sc in every stitch around.
Leave a long tail to use for attaching to the hat.
Begin with white yarn.
1. Ch 3. Skip one st and sc in next 2 chains.
2. Inc in every stitch around.
3. Inc once, Sc across, end with one Inc.
4. Inc once, Sc across, end with one Inc.
5. Dec once, Sc across, end with one Inc.
6. Sc in every stitch around.
7. Sc in every stitch around.
8. Sc in every stitch around.
Cut a short tail and weave ends in. You will need white thread to sew this onto your ear.
Begin with black yarn.
Chain 11.
1. Skip one chain, Sc in the next 5 chs, Inc once and Sc in the next 4 chs.
Cut a short tail and weave ends in. It's best to attach the white piece onto the orange piece of ear. The black piece will form to the top. Sew pieces into place.
Jellyfish Amigurumi Pattern
It's now up on Ravelry!
SUPPLIES
Worsted Weight yarn
G or D hook
Polyfill stuffing
15mm or 18mm safety eyes
Weaving needle
HEAD
Magic ring.
1. 6 single crochet into ring. (6)
2. increase around (12)
3. "Single crochet, increase" around (18)
4. Single crochet 2 times, Increase" around (24)
5.-11 Single crochet around. (24)
12. "Single crochet 3 times, decrease" around. Single crochet in the last stitch. (20)
13-17. Single crochet around. (20)
18. Single crochet once.
"Hdc 6 times in the next stitch, skip the next stitch, Single crochet in the next 2 sts" around.
Single crochet in the last stitch. (50)
Start stuffing and cut a short tail.
BOTTOM PIECE
Magic ring
1. 6 Single crochet into the ring.
2. Increase around. (12)
3. "Single crochet, increase" around. (18)
Hold up the piece FIRST underneath to line up with the hole. I like it to be small because then it'll lay flat. If it's too tiny, then do another increase round. Leave a long tail to attach around the very bottom of the 6 HDC's.
Then cut a long tail to attach it.
TENTACLES: Make 6 or 7
1. Chain 30.
2. Skip one, single crochet across.
3. Chain 1, skip one, single crochet across.
I always attach one tentacle in the middle and then two on each side. I turn it around and attach another across the middle one to make sure it lines up. There was enough space on mine to add a 7th one :)
Crochet Elephant Amigurumi Pattern


Here it is! One of my favorite animals... This tiny crochet elephant has been tested and the pattern is ready to go! It's in PDF form with a bunch of pictures for assembly and additional page for just printing :)
Materials:
· C or D crochet hook
· Worsted weight yarn
· 9mm safety eyes
· Polyfil stuffing
· Optional: Weaving yarn needle & pins (to hold ears in place)
Stitches:
· Single crochet
· Increase (two single crochet stitches in one)
Decrease (skip a stitch or single crochet 2 stitches together)
I will send you the PDF via email within 24 hours. If you make this, please share the pictures with me! I'll love to see :D
Crochet Pattern: Floral Headband


Flower: (crochet 5)
1. Chain 35. Skip the first chain. Single crochet in the next 3 chs.
Repeat { “Chain 3, skip next chain, single crochet in the next 3 chs” } til the end.
1. Chain 35. Skip the first chain. Single crochet in the next 3 chs.
Repeat { “Chain 3, skip next chain, single crochet in the next 3 chs” } til the end.
2. Chain 3. “Double crochet 3 times, slip stitch, double crochet 4 times” in the hole and sc in the next st.
Repeat {Dc 3x, sl st, Dc 4x" in next hole, sc in next }
Sc in the last two sts.
Repeat {Dc 3x, sl st, Dc 4x" in next hole, sc in next }
Sc in the last two sts.
Headband Piece:
Foundation- Chain 100. Cut.
1. Attach yarn by a single crochet in the 16th chain from one end. Single crochet across. Leave the last 16 chains untouched.
2. Turn. Chain 2. Skip first stitch, half double crochet across.
Sew on each flower onto the band piece or you could weave in ends to attach it!
I used to have a PDF for this but it is lost. I'm currently in the process of recovering broken elements.
Crochet Pattern: Duck Amigurumi with a Panda Hat
Supplies
❤ Wool of the Andes Worsted Yarn
❤ C or D & F hook
❤ Black felt for eyes.
❤ Thread
❤ Optional: yarn needle to weave ends in.
❤ Polyfill
❤ 2 pairs of 9mm safety eyes
You will need yellow, orange, white and black yarn.
Crochet the head halfway to experiment with placing the eyes. Make sure you make the mouth and place it before you put the backs on safety eyes! Stuff.
*The yarn I am using is tiny so I am making sure that the foundation area is small and tight before increasing in every stitch. Always remember to switch your hook to a F!
Head
(Use a small hook like C or D)
Magic ring.
1. Crochet 8 single crochets into the ring.
(Switch to a F hook)
2. Inc in each stitch around.
3. "Increase in one stitch, sc in the next" around.
4. Single crochet in each stitch around.
5. "Sc in next 2 sts, inc" around.
6. Sc in each stitch around.
7. "Sc in next 4 sts, dec" around.
8. Sc in each stitch around.
9 "Sc in next 5sts, dec" around.
10. Sc in each stitch around.
11. Sc in each stitch around.
12. "Sc in next 3 sts, dec" around.
13. "Sc in the next 3 sts, dec" around.
14. "Sc in the next 2 sts, dec" around.
Mouth
(Use a small hook like C or D)
Magic ring.
1. Chain 6.
2. Turn. Skip first stitch, sc across. Sl st in corner.
Body
(Use a small hook like C or D)
Magic ring.
1. 8 single crochets into the ring.
(Switch to a F hook)
2. Inc in each stitch around.
3. "Sc in next 5 sts, dec" around.
4-7. Sc in each stitch around.
8. "Sc in next 4 sts, dec" around.
This piece covers the hole:
(C or D hook)
Magic ring.
1. Chain 6
2. Sc once, inc twice, sc once.
Arms
(C or D hook)
Magic ring
1. 4 sc into the ring.
2-4. Sc in every stitch around.
5. "Sc in each stitch, dec once, sc in the rest" around.
Legs
(C or D hook)
Magic ring
1. 4 sc into the ring.
2-3. Sc in every stitch around.
*For the panda hat place it on your finished head! You'll be turning and crocheting back and forth. Use the duck's eyes as a guide as how far you should crochet across.
Panda Hat
(C or D hook)
Magic ring.
1. 6 sc into the ring.
(Switch to a F hook)
1. Inc in each stitch around.
2. "Inc, sc in the next stitch" around.
3. "Inc, sc in the next 2 sts" around.
4-6. Sc in each stitch around.
7. "Sc in the next 6 sts, dec" around.
8. "Sc in the next 6 sts.
9. Sc 6 times across, turn.
10. Chain 1, skip the first stitch and sc across to the *other eye.
11-14. Turn. Chain 1, Sc across.
15. Skip 2 sts, sc across, decrease in the last two sts. Sl St into the side.
Panda Mouth
(C or D hook)
Magic ring.
1. Ch 6
2. Skip the first stich, sc across. Sl st into side
I used black yarn for the nose/mouth :DEars(C or D hook)
Magic ring.
1. Ch 6.
2. Turn. Sc 2 times, inc in next 2 sts, sc 2 times.
3. Turn. Sc 3 times, inc once, sc in the remaining sts.
Cut out a square of black felt and place it over the panda's safety eyes. Cut the square into a circle based on the size. Always cut a little at a time just in case! Fold the circle and cut a tiny bit out to create a hole. Push the panda's safety eyes through and pop the back on to secure the piece. Sew on.
I don't think this is a project for a beginner because of all the pieces and sewing. I don't claim that my patterns are for any skill size so if you have any questions, comment or email!
Labels:
amigurumi,
crochet,
crochet pattern,
duck amigurumi,
patterns
Crochet Pattern: Quick Bulky Hat
Crochet hook M/9mm
Large button
Pattern
Start with a Magic Ring.
1. Double crochet 10 times into the ring.
Insert your stitch marker.
2. Double crochet twice in each stitch.
3. "2 dc in the next stitch, dc once in the next 2 stitches" around.
4. Dc in each stitch around.
5. Dc in each stitch around.
6 "Decrease, dc in the next 3 stitches" around.
7. Dc in each stitch around.
8. Dc in each stitch around.
9. Single crochet in each stitch around.
Sew on a button on a side. Done! :)
Pattern: Puff Stitch Hat
Puff stitch:
Yarn over, insert hook into the stitch, yarn over and pull thru 3 loops
*Yarn over, insert back into the stitch, yarn over and pull thru loops.*
(*repeat 3 more times)
Dec puff:
Yarn over, insert hook into front loop of the puff st then insert hook into the next st's front loop, yarn over and pull 3 loops thru.
Yarn over, pull 2 loops thru.
Video
If you prefer an image tutorial then here
Supplies:
❤worsted yarn
❤h hook (5.00m)
❤optional: yarn needle to weave ends in.
Pattern:
10 dc into magic ring.
Inc in each stitch around.
Ch 1. Puff st in each stitch. Slip stitch.
*Puff st in next 2 sts, inc* (two puff stitches in one!) around.
*Puff st in next 3 sts, inc puff st in next st* around
*Puff st in next 4 sts, inc puff st in next st* around
*Puff st in next 5 sts, inc puff st in next st* around
*Puff st in next 6 sts, inc puff st in next st* around
*Puff stitch in next 7 sts, inc puff st in next st* around
*Puff stitch in next 8 sts, inc puff st in next st* around
*Puff stitch in next 6 sts, dec puff in next* around
Puff stitch around (in each previous puff stitch)
Puff stitch around
Puff stitch around
Puff stitch around
Sc in each stitch around.
Sc in next 8 sts, dec


I love puff stitches!Anyone going to crochet this hat? ;D
Look on Ravelry!
Labels:
crochet,
patterns,
puff stitch hat,
RAW deep purple,
videos
Crochet Pattern: Pokeball Hat V.2
Here's a redo for the Pokeball hat! This is supposed to fit more loosely than my first pokeball hat. The biggest complaint was it could only fit a child's head. All of my hats are made to fit my own head which is a 22" head circumference.
The other difference is this circle piece should lie flat with the increase round.
Supplies:
- worsted yarn in red, black & white
- I hook
- yarn needle to weave ends in.
Hat
Red-
11 dc into ring.
2 dc around.
'2 dc, dc' around.
'2 dc, dc in next 2 sts' around
dc around
'2 dc, dc in next 3 sts' around
'2 dc, dc in next 4 sts' around
dc
Black
dc around
dc around
White
more or less for length
dc around
dc around
dc around
dc around
dc around
Circle piece
White
11 dc into ring, sl st.
Ch 2. hdc into a ch space. 2 hdc around.
Black
Attach, ch 1. sc increase around.
If you have made anything using my patterns, please send me pictures!
View this on Ravelry
Crochet Pattern: Puppy Amigurumi
Supplies:
❤ worsted yarn
❤ D hook
❤ optional: yarn needle to weave ends in.
❤ black yarn/thread for nose+mouth.
❤ 9mm safety eyes
Head:
6 sc into ring.
inc around.
*inc, sc* around.
*inc, sc in next 2 sts* around.
5 rounds: sc around.
*sc2tog, 3 sc* around.
*sc2tog, 2 sc* around.
safety eyes + stuff.
*sc2tog, sc* around.
sc2tog around + sl st into corner .
Snout:
6 sc into ring.
inc around.
ac around.
*dec, sc* around.
stuff lightly.
Body:
8 sc into ring
inc around.
*inc, sc* around.
sc around.
sc around.
sc 10 sts, dec (3), sc.
sc 7 sts, dec (2), sc in rest sts.
sc around.
circle piece:
this piece should cover the hole of the body. flat bottom piece.
8sc into ring.
inc around.
*inc, sc 2 sts* around.
❤If the piece is too bulky: Pull out a few stitches + match it up.
❤If the piece is too small: Do another increase around. If it's too big ^^^
Legs:
6 sc into ring.
sc around.
sc around.
sc around.
sc around.
decrease or increase the length for your liking
Tail:
I think I skipped a single stitch by accident. Do it in the middle!
6 sc into ring.
sc around.
sc around.
sc around.
sc around.
attach tapered end to the butt!
Ears (2)
Ch 3. skip first chain and sc in the other 2.
turn~ ch1, sc, inc
ch 1, sc, inc, sc
sc around.
ch 1, sc in 2 stitches, inc, sc in 2 stitches.
skip st, sc~ + skip st~ sc in last. sl st into the corner.
Labels:
amigurumi,
crochet,
dog amigurumi,
patterns,
puppy amigurumi
Crochet Pattern: Bow Headband

It's a little late! D: I'm going to make more of these. I don't wear headbands often and these keep the beast hair out of the face. I also made a thinner style headband that was only pinched in the center and sewed together.

Hook I.
Chain 14.
Color one:
1. Skip first chain, sc across.
2. Ch 1. Skip first sc, sc across & into side.
Repeat 24x
Color two: The bow!
Ch 1. Skip first sc, sc across & into side.
Repeat 22x
Color one:
Ch 1. Skip first sc, sc across & into side.
Repeat 24x or your length.
Try it on as you go and make sure there's no overlapping. Sl st together!
Use the second color and wrap it around in the middle to create the bow. Cut and secure! Or you can bunch up the section & sew it.
Bow headband made by doing Chain 7:

Labels:
bow headband,
crochet,
crochet pattern,
patterns,
RAW deep purple
Crochet Pattern: Triangle Scarf
Pattern:
I've used worsted and bulky types.
H to N hook. (depending on yarn type)
You can substitute double crochet with half double crochet if you like.
Foundation:
- Chain 3.
- 2 dc into the last chain. Ch 1, 3 dc (into last chain), ch 3. Turn.
Row 2:
- 2 double crochet in the first st.
- Chain 1. '3 dc, ch 1, 3 dc' in the ch 1 space (hole) *ch 1, 2 dc in last st.
- Chain 3, turn.
Row 3:
- 2 Double crochet in the first st.
- Chain 1. 3 dc in ch 1 space. Chain 1. '3 dc, ch 1, 3 dc' in the [hole].
- Chain 1. 3 dc in ch 1 space.
- Chain 1, 3 dc in last st. Chain 3, turn.
Repeat row 3 to get it as large as you would like.
I see this in my head better than explaining. I wouldn't deem this a beginner project! I put up bullet points to separate it into pieces.
How I see this:
The Chain 3 before Row 3 acts as the third double crochet.
- BEGIN ROW 3: 3 dc in each ch-space (hole) until you reach the middle point.
- Middle point: '3 dc, ch 1, 3 dc'
-Go back down the other side with 3 dc in each ch 1 space.
-While chaining one in between :)
You can attach yarn to make a double crochet rectangle to wrap or tie around yourself.
Sew on a large enough button and wear it like so.
I left tails on both sides to loosely tie it :)
I do have variations of this scarf that I'll be writing up shortly.
This is a basic pattern of this watermelon scarf. That one has a lace-esque edging and two rectangles on each side to tie/wrap around.
Crochet Pattern: Crochet Slippers


Materials:
-Vanna's Choice yarn
-Scrap yarn for flower opaque
Hooks:
-I(or H) for the actual slipper
-G if you need a snug fit around & the back of the heel.
-10 (1.15mm) for the white circle button.
Follow the pattern for a US 7-7.5 fit.
People have said this pattern is too loose, try a smaller hook!
Orange, I hook-I(or H) for the actual slipper
-G if you need a snug fit around & the back of the heel.
-10 (1.15mm) for the white circle button.
Follow the pattern for a US 7-7.5 fit.
People have said this pattern is too loose, try a smaller hook!
Use a stitch marker.
-Chain 2.
1. 6 sc in first ch. Slip stitch to join.
2. Increase in each stitch.
3. 'Sc, inc' around.
4. 'Sc in next 2 sts, inc.' around
5. Single crochet around
6. Single crochet around
7. Single crochet around.
8. Single crochet around.
9. Single crochet around.
10. Single crochet around.
11. Single crochet around.
12. Single crochet around
(8 rounds)
Try on the piece and make sure it covers your toes nicely. Crochet more or less rounds to fit.
13. Decrease once, sc across to the corner. Decrease once in the next corner.
(X's showing each decrease.)
Tip: Fold the piece to find the corners. Wear it and put markers in.
*I crocheted 17 single crochets across to cover. You want some material to go on top of your foot (the purple in the image). You don't want it to be too low.
14. Sc once. Chain 1. Turn the piece and single crochet 17* times.
15. Turn. Chain 1. Sc across.
16. Repeat 'Turn. Chain 1. Sc across' until it covers the back of your heel.
(Mine: 19 rounds)
-Put the back sides together to form the heel and slip stitch it shut.
Skip the last slip stitch and pull the yarn through the hole to form that round/curved back shown in the left image.
Cut yarn. Attach yarn to the top and slip stitch twice in each hole to create an edging.
Skip the last slip stitch and pull the yarn through the hole to form that round/curved back shown in the left image.
Cut yarn. Attach yarn to the top and slip stitch twice in each hole to create an edging.
Make it more snug plz:
H or G hook: I attached yarn at one side and crocheted across the heel:
Sc, dec across (3-4) and ended with a sc.
Extra (optional)
I hook, orange:
1. Ch 16, skip stitch. Hdc across.
2. Ch 1, hdc in each stitch.
3. Skip 2 sts, hdc across in each stitch.
4. Skip 2 sts, sc across in each stitch. Sl st.
G hook, blue edging:
1. Slip stitch twice into each hole. Slip stitch together.
Circle with a crochet hook- 10 1.15mm:
1. Ch 9. Join to form a ring. Ch 4 , Dc in ring, Ch1 11-12 times, Sl st to join.
2. Ch 1. * Sc in dc, Sc in ch-1 sp * repeat. sl st to join.
Skip all the extras and put on your slipper ( attach yarn in middle) and chain to other side for Mary Janes!


%20copy.png)
.png)