
11.17.2009
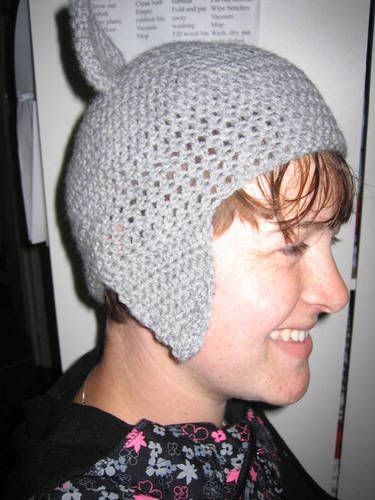
Crochet Pattern: Kitty Hat with Earflaps
I used Red Heart soft yarn/medium/4 and stuffed the ears!
It's currently being tested :)
Bubblegum_phoenix (from Craftster.org) tested and gave me revisions!
Patons merino/medium 4.5mm hook and did not stuff ears.
Foundation: Chain 3. Dc 8 times into the third ch from hook. Join by sl st.
1. Ch 2. 2Dc in ea dc. join.
2. Ch 2. Dc in next st, 2 Dc in next st around. join.
3. Ch 2. Dc in next 2 sts, 2 Dc in next st around. join
4. Ch 2. Dc in next 3 sts, 2 Dc in next st around. join.
5. Ch 2. Dc in next 4 sts, 2 Dc in next st around. join.
6. Ch 2. Dc in next 5 sts, 2 Dc in next st around. join.
7. Ch 2. Dc in next 6 sts, 2 Dc in next st around. join.
8. Ch 2. Dc in next 7 sts, 2 Dc in next st around. join.
9. Ch 2. Sc in next 8 sts, 2 Sc in next around. join
Increase to 9-11 SCs (+ ',2 sc in next st around') if you have to.
++Receiving emails that this hat is small (faq)
10. Ch 2. Sc in ea st. join
11-13. Ch 2. Sc in 7sts, sc-tog (decrease) in next st around. join.
14-15. Ch 3. Sc in each st. join
Repeat until the desired length or until beanie reaches the top of your ears.
Decide where you want your earflaps to be.
I fold the hat so the back seams at the back (rather than down a side) and count along the side, placing a stitch marker where I want to start.
EARFLAPS
1. Make a slipknot, join where you want to start by doing a sl st. Sc across 12 sts. turn.
2. Ch 1, skip 1, sc across 11 sts. turn.
3. Sc in all stitches across. turn.
4-5. Ch 1, hdc across 11 sts. turn.
6. Ch 1, skip a stitch, hdc-tog in next 2 sts, hdc 8 times across. turn.
7. Ch 1, skip a stitch, hdc-tog in next 2 sts, hdc 6 times across. turn.
8. Ch 1, skip a stitch, hdc-tog in next 2 sts, hdc 4 times across. turn.
9. Ch 1, skip a stitch, hdc-tog in next 2 sts, hdc 2 times across. turn.
10. Ch 1, hdc-tog in next 2 sts. turn.
11. Slip stitch into the last top hdc.
Measure by folding the hat and comparing lengths to start on the other side.
CAT EARS
(make 2, working in the round)
1. Ch 2. hdc 6 times into ring.
2. Ch 1, 6 hdc around.
3. Ch 1, 2 hdc in each sc around.
4. Ch 1, 12 hdc around.
5. Ch 1, *2 hdc in next st, 1 hdc* around.
6. Ch 1, hdc in each stitch.
7. Ch 1, *2 hdc in next st, hdc in next 2 sts* around.
8. Ch 1. sc in each sc around.
Tie off and stitch in position of where you want the ears. Best way to do this is put the hat on and carefully pin in place first.
View this on Ravelry!
Subscribe to:
Posts (Atom)


Social Icons