
12.29.2016
Favorite Logo Designs for Fiverr Clients
It's been a while since I posted because things keep coming up! I'm trying to do so many things. Here are some logos I created for clients via Fiverr since my last logo post. I usually create 2 or 3 ideas for them to choose from based on the information they provide.
Sometimes I'll get clients that know exactly what they want down to the font, hex codes, and layout. However, I'm usually only given a basic idea such as font style or colors they like or even just their blog or website URL and then I have to come up with a concept based on what I think would work best.
Here are some of my favorites:

I love this one because it's so simple yet adorable because of the brush style font and the tiny heart!

This logo was inspired by Lolita Fashion, elegant and cute with lots of pink and a scalloped lace design.

Another simple design with hand-drawn wings & a lovely brush font in a blue, purple, and pink gradient.

Another scalloped design but with a simple vector hamster & house design.

A simple watercolor bee with red heart wings. During the concept stage, I like to go with the font style originally requested and sometimes I'll take a chance and add another variation with a completely different font... Turns out the client loved this one for a square format!
I haven't worked on logos in about a month or so due to my busy schedule. I'm working on my amigurumi pattern book, the www.AmigurumiBox.com website (which is like a pattern marketplace and more), trying to write my novels, crochet for fun, and blah blah blah. I had to put my gig on hold. I was thinking about moving from Fiverr to my own website eventually... but the Fiverr order system is so convenient.

10.25.2016
Design Inspiration: Sophia Font

Sophia by Emily Spadoni is one of my favorite fonts. It's an adorable hand-lettered brush typeface perfect for a variety of projects! I especially love the ornamental fonts (Sophia Left and Sophia Right) which enable you to add a decorative swirl at the beginning and end.
Here is something I made using this lovely font:

Remember to check out her other amazing fonts at her shop!
10.19.2016
More Jewelry + FotoFuze for photo editing!

I was making quite a bit of jewelry months ago and it took me a while to get around to taking photos of them with my DSLR. I listed some of these in our new Tiny Moon shop on Storenvy.
I love these blue howlite beads look with the pearls. I'm probably going to make different color versions of this later.

Pastel oreo cookie earrings made by Crissy out of polymer clay. I only added some ear wires to them!

I'm obsessed with these amethyst stones so I'm always trying to not use them all at once! ;)

Blueberry cupcake ring made by Crissy out of polymer clay and it is modeled by my 4-year-old monkey.

Wire wrapped elephant pendant and various glass beads with dyed howlite beads!

A "slave bracelet" with turquoise stone beads.
I'm probably going to do some more wire wrapping soon. Maybe some rings!
P.S.
I edited these photos using FotoFuze. It's a free product photography enhancement application that removes distracting elements from the background and gives you a crisp plain background.
I really like using it when I don't feel like using Photoshop (or when I just don't have access to it because I'm on a different computer!) so I'm always looking out for great browser-based photo editing programs.
For best results, photos should be taken on a white or black background that is as texture-less as possible. I took my photos on a dark brown table that had a bit of texture to it and it worked well enough.
You can sign up via your Etsy account and grant the application access to your Etsy account to directly edit photos from your listings. Or you can just do what I did and create an account on FotoFuze and upload your photos into the application instead.

To select the product from the background, you use the yellow highlighter tool by coloring over all of the object. It needs to be entirely filled in or it won't render correctly. They have a "check for errors" box right next to your image that shows red on the possible problem areas. You can also use the eraser tool if you selected too much or on the wrong area.
Another nice feature is that you can highlight some of the shadows behind the product and those will show up in your new fancy background.
Do you have any favorite browser photo editing programs? I also like using Pixlr for basic retouching.
10.17.2016
Etsy Shop Feature: KicaBijoux

It's been a while since I posted an Etsy shop feature. I'm always looking out for unique goodies on Etsy and I love to help out indie shops by sharing their items. I'm going to try to do a weekly post on my finds and I'm giving the shop owners an opportunity to share a bit more about their shops such as their crafting process, upcoming projects, and special sales.
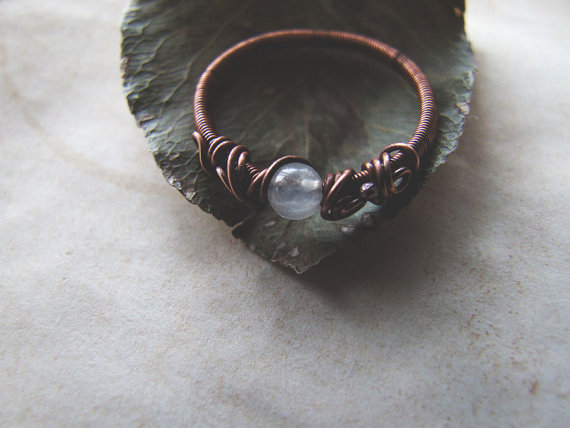
This week's feature is on the magical designs by Kasia of KicaBijoux. Beautiful copper wire wrapped jewelry with lovely stones and unique beads. Many of the designs have a nice woodland and rustic feel to them. It's impossible to pick only a few favorites!!
I love the wire design of the Elvish Necklace!

I like the simplicity of the Blue Agate Ring. Isn't the blue striking?

I love the shape and all the little design elements of the Bohemian Dangle Earrings.

The color is gorgeous! Forest Fluorite Drop Necklace

I really like how these Pink Boho Earrings have an antique look to them.

The different colors and texture go so well together! Green Jasper Necklace

The Elvish Forest Earrings have such a lovely intricate design.
Check out the many other items from KicaBijoux and follow her on Facebook and Instagram to keep up to date with new products.
Also, I'm delighted to share that Kasia is offering a special coupon code for the readers of Tiny Moon! The code is TINYMOON30 and it's for 30% off everything. The code is valid until the end of November 2016.
I'm definitely going to place an order soon! Which ones are your favorite?
I'm definitely going to place an order soon! Which ones are your favorite?
10.09.2016
Cute Vintage Planter Finds

I thought I would post about some of my recent favorite vintage planter finds because these are too cute to not share.


I'm pretty much in love with this blue cat planter from TresorsEnchantes. It reminds me of Lefton's blue Miss Priss.
This little lamb planter from Acrossthegap is an unique design. I love all the details.
Cute puppy planter from AllMyVintageLove. I love the pose on this one, it makes it more adorable.
I haven't seen a lion planter like this before. So much character. The face is cute and funny! You can find this at KanariKouture.
Because snails are awesome. Look at the embossed little details! This planter can be found at MerryUnicornVintage.
I love the flowers and the adorable face of this elephant planter from TheSweetBVintage.
9.06.2016
Baby Vulpix Amigurumi Pattern


I decided to republish this pattern here because I've been getting more and more requests to put it back up. (Pokemon Go!!?) I'd like to crochet another one soon (but with safety eyes!) so I can improve the pattern's clarity.
- ch - chain
- dc - double crochet
- hdc - half double crochet
- sc - single crochet
- sc2tog - single crochet 2 stitches together
- sl st - slip stitch
- sk - skip
- st(s) - stitch(es)
- R# - round/row
Head:
With light brown yarn,
R1: 6 sc into magic ring. (6 sts)
R2: *2 sc in st, sc in next st* rep to end. (9 sts)
R3: *2 sc in st, sc in next 2 sts* rep to end. (12 sts)
R4: *2 sc in st, sc in next 3 sts* rep to end. (15 sts)
R5: *2 sc in st, sc in next 4 sts* rep to end. (18 sts)
R6: *2 sc in st, sc in next 5 sts* rep to end. (21 sts)
R7: *2 sc in st, sc in next 6 sts* rep to end. (24 sts)
R8: *2 sc in st, sc in next 7 sts* rep to end. (27 sts)
R9-11: Sc in each st around. (27 sts, 3 rounds)
Start stuffing.
R12: *Sc2tog, sc in next 7 sts* rep to end. (24 sts)
R13: *Sc2tog* around. (12 sts)
R14: *Sc2tog* around. (6 sts)
Finish stuffing and fasten off, leaving a tail. Thread yarn onto yarn needle and insert the needle through the front loop of each stitch. Pull the tail tight to close the hole.
Body:
With light brown yarn,
R1: 6 sc into magic ring. (6 sts)
R2: *2 sc in st, sc in next st* rep to end. (9 sts)
R3: *2 sc in st, sc in next 2 sts* rep to end. (12 sts)
R4-5: Sc in each st around. (12 sts, 2 rounds)
R6: Hdc in first st, dc in next 2 sts, hdc in next st, sc in next 2 sts, sl st in next 4 sts, sc in last 2 sts. (12 sts)
R7: Hdc in first st, dc in next 2 sts, hdc in next st, sc in next 8 sts. (12 sts)
R8: Hdc in first st, dc in next 2 sts, hdc in next st, sc in next 2 sts, sl st in next 4 sts, sc in last 2 sts (12 sts)
Stuff. Fasten off, leaving a long tail for sewing. Sew the head onto the body.
Eyes (Make 2):
With black yarn,
R1: 6 sc into magic ring. (6 sts)
R2: *2 sc in st, sc in next st* rep to end. (9 sts)
Fasten off, leaving a long tail for sewing.
With white yarn doubled, embroider a french knot (3 loops) onto the eyes.
Then sew the eyes onto the head about 2 rows above the nose.
Nose:
With black yarn, stitch on the nose between R2-3 of the Head by making a few horizontal lines the width of about 2-3 sts.
Ears (Make 2):
With light brown yarn,
R1: 4 sc into magic ring. (4 sts)
R2: *2 sc in st, sc in next st* rep to end. (6 sts)
R3: *2 sc in st, sc in next 2 sts* rep to end. (8 sts)
R4: *2 sc in next st* x2, sc in last 6 sts. (10 sts)
R5: *2 sc in next st* x2, sc in last 8 sts. (12 sts)
Don't stuff. Fasten off, leaving a long tail for sewing.
With dark brown yarn, stitch on the inner ear by making vertical lines into a triangle shape. Working into the same spot at the top of the ear and working down along the bottom edge of the ear. Then sew the ears on the sides of the head about 2-3 rows above the eyes.
Legs (Make 4):
With dark brown yarn,
R1: 6 sc into magic ring. (6 sts)
R2: Sc in each st around. (6 sts)
Change to light brown yarn and fasten off dark brown yarn,
R3: Sc2tog, sc in next 2 sts, sc2tog. (4 sts)
R4-6: Sc in each st around. (4 sts, 3 rounds)
Don't stuff. Put in a small piece of pipe cleaner in the legs. Fasten off, leaving a long tail for sewing. Sew the legs onto the body.
Bangs (Make 1):
With orange yarn,
R1: Ch 7, sk st, sc in next 6 sts. Ch 1, turn. (6 sts)
R2-4: Sc to end. Ch 1, turn. (6 sts, 3 rows)
R5: *Sc2tog* x2, sc in next 2 sts. Ch 1, turn. (4 sts)
R6: Sc in next 2 sts, sc2tog. Ch 1, turn. (3 sts)
R7: Sc2tog, sc in next st. Ch 1, turn. (2 sts)
R8: Sc2tog, Ch 1.
Fasten off.
With orange yarn, insert hook into the top edge of the left side of the bangs piece and (dc, hdc, ch 1, hdc, dc, ch 1, sl st) into the same space. Fasten off. Turn the work over and do the same stitches on the edge on the other side. Turn your work back to the right side and starting at the top edge of the smaller bangs piece, single crochet along the edges of all of the pieces.
Fasten off, leaving a long tail for sewing. Weave in the other ends and sew the bangs onto the top of the head between the ears.
Hair Rolls (Make 3):
With orange yarn,
R1: 6 sc into magic ring. (6 sts)
R2: *2 sc in st, sc in next st* rep to end. (9 sts)
R3-8: Sc in each st around. (9 sts, 6 rounds)
Stuff. Fasten off, leaving a long tail for sewing. Fold the top of the pieces down and sew onto the back of the head behind the bangs.
Tails (Make 6):
With orange yarn,
R1: 6 sc into magic ring. (6 sts)
R2: 2 sc in each st around. (12 sts)
R3: *2 sc in st, sc in next 2 sts* rep to end. (16 sts)
R4: *2 sc in st, sc in next 3 sts* rep to end. (20 sts)
R5-7: Sc in each st around. (20 sts, 3 rounds)
R8: *Sc2tog, sc in next 3 sts* rep to end. (16 sts)
Start stuffing.
R9: *Sc2tog, sc in next 2 sts* rep to end. (12 sts)
R10-18: Sc in each st around. (12 sts, 9 rounds)
Finish stuffing.
R19: *Sc2tog, sc in next st* rep to end. (8 sts)
R20: Sc in each st around. (8 sts)
Fasten off, leaving a long tail for sewing on just one of the pieces. Fold the top pieces down and sew the ends of the 6 tails together securely before sewing them onto the body.
If you make this Vulpix, I'd love to see it! Please add it on Ravelry or post photos in the comments!! :)
Originally made in 2012.

Note: Vulpix and Pokemon are copyright to Nintendo.
Pattern © Adorably Kawaii. This pattern is for personal use only. Please don't redistribute/resell the pattern in any way or form.
If you'd like to share my free patterns, please link to my pattern instead of copying and pasting the written pattern.
8.01.2016
Etsy Shop Feature: Ornately Lanterns

As I was searching on Etsy for cute stuff for the garden, I found Ornately Lanterns and fell in love with this cat suncatcher glass block! The colors are so beautiful!! I love designs with cats with moons & stars, pretty sure it's due to my obsession with Sailor Moon. ;)
Clare handpaints lanterns, glass blocks, mason jars, and more! Here are a few more of my favorites, very very difficult just choosing a few.


Elephants Painted Glass Block

And the last one I'm sharing... The Rainbow Farm Painted Glass Block is so cheery & adorable. I love all the little details in the valley and the vivid rainbow!
Clare handpaints lanterns, glass blocks, mason jars, and more! Here are a few more of my favorites, very very difficult just choosing a few.
The little cat lantern version. It's so pretty with a candle!
Isn't this one awesome? She originally designed it for an Indian craft fair. I love the rich colors in this one.
Do you like suncatchers as much as I do?! Check out the rest of her designs in her shop.
Which ones are your favorites?
7.28.2016
16 Floral Mitten & Glove Patterns

I love flower and lace motifs so I put together a collection of some of my favorite crochet and knit mitten/glove patterns. It's not quite cold here in California yet but it's never too early to start making winter accessories!


Which designs are your favorites?
Crochet:
$5.00 USD
$4.00 USD
$3.41 USD

Published in the book Ruby & Custard's Crochet
Free
Free
Free
Knitting:
$5.50 USD
$6.04 USD
$4.64 USD
$4.64 USD
$4.00 USD
$5.00 USD
$5.50 USD
Free
Free
Which designs are your favorites?
Subscribe to:
Posts (Atom)


Social Icons